Table of Contents
1. Introduction: PocketMoney
Know your Palm Computing Device
What’s Included
Installing PocketMoney
Purchasing PocketMoney
Registering PocketMoney
2. Basics
Opening PocketMoney on Palm OS
Accounts
Transactions
Data Entry Screen
Register Screen
Menus
Options
Register View
Tools
Record
Lists
Account View
Report
3. Samples
Starting Balance for Checking
Starting Balance for Visa
Transfer Transaction
Withdrawal Transaction
Deposit Transaction
Transaction in Foreign Currency
4. Features
List Editor
Category Splits
Preferences
Account Info
Currency & Exchange Rate
Creating an Account
Deleting an Account
On Screen Reports
Filtered Balance
Category Expenses
Payee Expenses
Account Expenses
Custom Filters
Reconciling Accounts
Rolling Up Transactions
Recompute Balances
Recurring Transactions/Standing Orders
5 . Interfacing PocketMoney with
Desktop Applications
Installing Macintosh Conduit
Installing Windows Conduit
Import and Export Formats
Tab-delimited Format (TDF)
Quicken Interchange Format
(QIF & QIF-Old)
Conduit Settings
Exchanging Data
Upload from Palm to Desktop
Download from Desktop to Palm
HotSync Scenarios
IR Sync Option (IR, Bluetooth, SMS)
4. Features
Chapters 2 and 3 covered basic transaction entry and navigation. This chapter covers all other PocketMoney features.
List Editor
The editor is how you edit PocketMoney customizable pop-up lists. Lists that are editable are: Categories, Payees, ID#s, Amounts, Currency Prefix, and Currency Suffix. Use the List Editor as follows:
• Select Edit in the pop-up list to bring up the List Editor so that you may add, rename or remove list items.
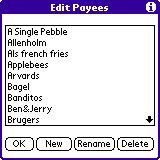
• To Add an Item to the List, tap New.
• To Rename an Item, select the item you want to rename and tap the Rename button. Enter the new name.
• To Remove an Item from the List, select the item, and tap Delete.
Note: Payees are based on the currently selected category so the list will only show items for the current a category.
Note: To enter sub-categories and sub-sub-categories you must separate them by a colon (:). (IE: Utilities:Gas or Utilities:Electric)
Category Splits
The category pop-up has a choice called <—Splits—>:
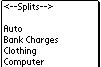
Select <—Splits—> to activate the Splits screen or tap on the category label open the Splits window.
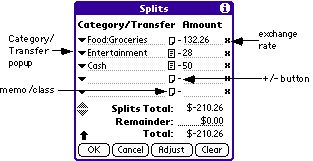
Splits allow entry of up to 255 categories with varying amounts for a single transaction. Enter negative amounts if you want to take out taxes from a deposit for you salary.
• Adjust - sets the transaction’s overall Amount to the Splits Total’s amount.
• Clear - removes all of the splits entered for this transaction.
• Category/Transfer popup - click the popup to choose between category or transfer. Selecting category opens a category picker. Selecting transfer opens an account picker.
• Memo/class - opens the memo screen which also allows the setting of the class for the individual split item.
• Exchange rate - opens the exchange rate worksheet to set the exchange rate for an individual split item.
• +/- sign - toggles the amount from negative to positive. Negatives amounts take away money from the account. Positive amounts add money to the account.
Note: If there is a Remainder after you have entered all of the amounts you either need to add the remainder on the last line or you should Adjust the total for the transaction.
Preferences
The PocketMoney Preferences screen is accessed from the Options menu
 :
: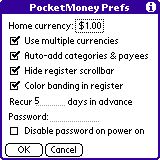
It includes the following items:
• Home Currency - defines the default currency that all new accounts use. It also is the currency format used to calculate the Total Worth. Tap the Home Currency amount to change the default currency.
• Multiple currencies - specifies use of multiple currencies. Check the check box to allow the use of multiple currencies.
• Auto-add categories & payees - determines the behavior of the pop-ups automatically. Check the check box to add any new category or payee to the pop-up lists.
• Hide Register Scrollbar - hiding the scrollbar can speed up the transaction display in the register view. Use the up and down scroll arrow buttons to scroll the data in the register view.
• Color banding in register - turn on color use in register and account list screen. Set the color of the rows with the Set Row Color in the Options menu.
Note: Color banding causes the screen to draw slowly on some devices. Uncheck Color Banding to speed these devices up.
• Recur X days in advance - enter the number of days in ahead of the scheduled repeating transaction time to add the repeating transaction to the register. This allows you to see what bills are upcoming.
• Password - enter 1 to 4 digits for a password. To remove the password erase it. PocketMoney will ask for a password whenever it is launched.
• Disable password on power on - some applications conflict with PocketMoney’s password feature. Checking this option avoids the conflict by preventing PocketMoney from displaying the password screen after a power on.
Account Info
The Account Prefs screen allows you to supply detailed information about particular accounts and set default values and behavior for those accounts.
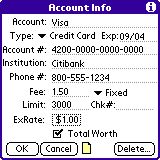
It includes the following data items:
• Account - name as appears in the Account lists. Write in the name of the new account.
• Type - defines a particular type of account, such as bank, cash, or credit card. Tap the Account Type  and then tap the desired type.
• Exp - is displayed when Type is Credit Card or Bank. This allows you to write in an expiration date for your credit card, for reference.
• Account # - defines an account number, for reference.
• Institution - defines the name of the institution who issued the account, for reference.
• Phone # - defines a phone number for the institution, for reference.
• Transaction fee - accepts a numeric value to use in conjunction with the Include Fee option on the Data Entry Slip Id # field. Write in a value.
• Fixed or Percent - determines how the Transaction Fee is applied. Tap the Fixed  or Percent
  to select a fixed value added to the transaction amount or as percent of the transaction amount. For example, 1.00 as a fixed amount means one dollar. 1.00 as a percent amount means 1 percent.
• Limit - accepts a numeric value to represent the account’s minimum balance or credit limit requirements, if any. For Bank and Cash types of accounts PocketMoney warns you if your balance ever falls below this amount. For Credit Card accounts PocketMoney warns you if your balance ever exceeds this amount. Leave Limit blank if you do not want to be warned. Write in a value to set the limit.
• Chk# - accepts a numeric value which is the next check number.
• Exchange Rate - displays the exchange rate and currency format for the selected account. Tapping it opens the Currency & Conversion Rate editor.

Prefix - is the symbol that appears before the amount.
Suffix - is the symbol that appears after the amount.
Decimal Places - specifies the number of decimal places in the currency. For example Japanese Yen have zero decimal places.
Rate - is the amount of this currency that is equal to 1 unit of the Base Currency. Base Currency is set in Prefs.
• Total Worth -determines whether this account’s balance is added to the Total Worth calculation in the Account List screen. Check the check box to include this account in the Total Worth calculation.
• Notes - allows space for miscellaneous information for the account.
Creating a New Account
From the Account List screen tap
 . This opens a new Account Info screen for you to name and enter the details for the new account.
Deleting a Account
Tap
 to delete all information for the displayed account. PocketMoney asks you to confirm the deletion.
Note: Deleting the account deletes all transactions associated with that account.
On Screen Reports
The Tools menu provides access to PocketMoney’s reports. The Tools menu is accessible from the Register screen.
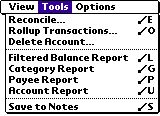
Filtered Balance Report
The Filtered Balance report sums up all transactions based on the current filter setting. This feature allows you to get a balance for a current set of data. For example, if you set the custom filter category to Food, Filtered Balance gives the total that you have spent on food in all of your accounts. Refer to “Custom Filters” for further information.
Category Expenses
Category Expenses displays the amount of money spent broken down by category. You can define the scope of the report by setting the filter. Refer to “Custom Filters” for further information.
Payee Expenses
Payee Expenses displays the amount of money spent broken down by payee. You can define the scope of the report by setting the filter. Refer to “Custom Filters” for further information.
Account Expenses
Account Expenses displays the amount of money spent broken down by account. You can define the scope of the report by setting the filter. Refer to “Custom Filters” for further information.
Custom Filters
Filters are a powerful way to display and report on subsets of transactions. PocketMoney dynamically updates the views of the data represented by the currently selected filter every time the screen is redrawn.
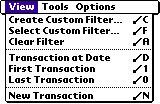
From the Register screen tap Menu and select Create Custom Filter from the View menu or write  .
.
Pick which items you would like displayed:
• Trans (action) - allows selection of Deposit, Withdrawal,Transfer, All Transactions, and Repeating Transaction to include in the filter. Tap the Transaction  and select the transaction classification.
• Account - allows selection of particular account to include in the filter. Tap the Account  and select the account.
• Class - allows selection of particular class to include in the filter. Tap the Class  and select the Class.
• Category - allows selection of particular category to include in the filter. Tap the Category  select tap the category. The filter matches any category that starts with what is entered. If “Utilities” is entered then “Utilities:Phone” and “Utlities:Electric” are displayed.
• To/From - allows selection of particular payee or source to include in the filter. Tap the To/From  and select or write the item.
• ID# - allows selection of particular ID# type to include in the filter. Entering “ATM#” will show all entries that begin with “ATM#”. Tap the ID#  and select or enter the item.
• (Dates) From - allows selection of a start date to include in the filter. Tap the From  to bring up the Date Editor.
• (Dates ) To - allows selection of ending date to include in the filter. Tap the To  to bring up the Date Editor.
Two special cases for Date To and Date From are:
Today: If selected PocketMoney will replace “Today” with the current date whenever the filter is evaluated.
1st of Month : If selected PocketMoney will replace “1st of Month” with the first day of the current month. For example, if today is May 12, 2000 then PocketMoney will use May 1, 2000.
• Cleared - allows selection of cleared/uncleared status to include in the filter. Tap the Cleared  and select the cleared status setting (Yes/No/Doesn’t matter).
• Recent - checking this will show only items that have changed since the last upload.
Several buttons at the bottom of the filter screen determine the disposition of the filter conditions:
• Tap Set to set the filter as defined in the Filter screen.
• Tap Cancel to close the Filter Conditions screen and leave the filter unchanged.
• Tap Save to save the filter conditions with a name that you choose. That name now appears in the Custom Filter pop-up when you select the “Select Custom Filter...” option in the View menu.
• Tap Remove... to delete a previously saved filter.
Note: If you change a transaction value that does not conform to the current filter, the transaction will not appear in the Register Screen when you close the Data Entry Slip.
Reconciling Accounts
Reconcile an account as follows:
1. Mark transactions that appear on your bank or credit card statement by checking the cleared box on the Overview Screen or the Data Entry Slip. You may want to enter transactions from your statement that have not already been entered into PocketMoney.
2. Tap Menu and select “Reconcile...” from the Tools menu.

3. Enter the balance from your bank or credit card statement on the input line. Remember that liability accounts such as credit cards and loans have a negative balance, and you should enter a negative amount on the input line to reconcile these types of accounts.
4. Tap Cleared. Cleared reconciles the account based upon cleared transactions only.
Note: The All Transactions choice allows reconciling of accounts that include cleared and uncleared transactions. This is useful for reconciling your Pocket/Cash accounts.
5. Tap Reconcile.
6. PocketMoney calculates how much must be posted to the account to reconcile it and prompts you to post x dollars to the account to reconcile it. Tap OK to create a reconciliation transaction.
Rolling Up Transactions
Rollup works as a function to delete all found transactions. It deletes all the transactions found by the current filter and adds one transaction to take their place. Because it deletes many transactions, this is NOT REVERSIBLE, so be certain this is what you want to do.
This feature is useful for users who want to use PocketMoney to track transactions on the road and use a PC or Macintosh-based financial program to track data the rest of the time. You can export PocketMoney data to your desktop program and then choose Rollup Items to remove all the transactions exported. This way, the next time you export you will not get duplicate transactions.
This feature used in conjunction with a Custom Filter can be used to Rollup all transactions from last year. This allows you to keep only the most recent data in PocketMoney thereby saving storage space.
Rollup a set of transactions as follows:
1. Create a filter to select the transactions you want to rollup. (See “Custom Filters” for more information).
2. Tap Menu and select Rollup Transactions... from the Tools menu.
3. The found transactions are counted along with the number of transfers.
Note: Transfers are rolled up by breaking the other end of the transfer into a withdrawal or deposit.
4. Tap to confirm that you want to rollup the found transactions.
5. PocketMoney will remind you that this action is NOT REVERSIBLE. If you still want to rollup all items, tap OK.
Recompute Balances
You must recompute balances if you modify your PocketMoney data from an external source or if PocketMoney runs out of memory before it can save a transaction and update the account balance which will result in incorrect balances.
To recompute balances, tap Menu and select Recompute Balances from the Options menu.
Repeating Transactions/
Standing Orders
If transactions occur on a regular basis (paychecks, rent, car payments,..) can be automatically entered by PocketMoney.
Tap the Repeating Transaction Button on the Edit Transaction screen top open the following screen.
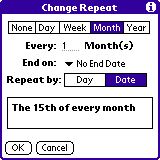
Set how often you want the transaction to repeat and tap OK. PocketMoney creates a repeating transaction with the current transaction’s account, category, payee, amount, cleared checkbox, and memo.
Note: If you go back and change any values in the transaction the repeating transaction values will also be changed. The exception to this is if you check the cleared checkbox in the register view. This allows you to create a transaction that has not yet been cleared , have it repeat as an uncleared transaction and then check it off as cleared when you reconcile PocketMoney with your bank statement each month.
You cannot create a repeating transaction with the amount blank and fill it in when you pay the bill. An example would be the electric or telephone bill that will be about the same price every month, but will vary by a few dollars. For this sort of repeating transaction you should make it a repeating transaction and correct the amount each month.
Chapter 4