Table of Contents
1. Introduction: PocketMoney
Know your Palm Computing Device
What’s Included
Installing PocketMoney
Purchasing PocketMoney
Registering PocketMoney
2. Basics
Opening PocketMoney on Palm OS
Accounts
Transactions
Data Entry Screen
Register Screen
Menus
Options
Register View
Tools
Record
Lists
Account View
Report
3. Samples
Starting Balance for Checking
Starting Balance for Visa
Transfer Transaction
Withdrawal Transaction
Deposit Transaction
Transaction in Foreign Currency
4. Features
List Editor
Category Splits
Preferences
Account Info
Currency & Exchange Rate
Creating an Account
Deleting an Account
On Screen Reports
Filtered Balance
Category Expenses
Payee Expenses
Account Expenses
Custom Filters
Reconciling Accounts
Rolling Up Transactions
Recompute Balances
Recurring Transactions/Standing Orders
5 . Interfacing PocketMoney with
Desktop Applications
Installing Macintosh Conduit
Installing Windows Conduit
Import and Export Formats
Tab-delimited Format (TDF)
Quicken Interchange Format
(QIF & QIF-Old)
Conduit Settings
Exchanging Data
Upload from Palm to Desktop
Download from Desktop to Palm
HotSync Scenarios
IR Sync Option (IR, Bluetooth, SMS)
2. Basics
This chapter covers basic PocketMoney transaction operations and screens. Refer to “Features” for full coverage of all of PocketMoney’s features.
Opening PocketMoney on Palm OS
To access PocketMoney, simply:
• Tap Applications then tap PocketMoney.
HINT: Set a hard button in the Palm’s Prefs to PocketMoney so it can be quickly accessed.
Accounts
You may create as many accounts as needed in the Account screen by tapping the New button (See Account Prefs” for more information). Accounts that represent your assets (checking, savings, and petty cash) normally have a positive balance. Accounts that represent liabilities (i.e., money you owe), such as credit cards, normally have a negative balance, until you pay them off. With this representation, a calculation of your net worth, for example, would simply be a sum of the balances in all the accounts.

• Account Info Button - opens the Account Info screen. The Account Info screen sets general information about the account and is where you access the Delete button to delete the account.
• Total Worth Checkbox - check this box to add the account into the total worth calculation. This can be turned on in the Account Info screen by checking Total Worth Calculation.
• Cleared/Balance - pop-up to display either the cleared balance, running balance or the absolute balance for the accounts. The running balance is the balance of the account as of the current date and time so repeating transactions that are entered in advance of paying them are not included in the running balance.
• Total Worth - the sum of the balances of all of the accounts displayed which have Total Worth Calculation turned on.
• New - button creates a new accounts.
• Shortcut 1 - to quickly create a new transaction in an account without opening the register tap on the balance of the account.
• Shortcut 2 - to view all transactions for all accounts tap the Account label .
Accessing a particular Account Register
To access the corresponding Register from the Account Screen, simply tap the account name.
Transactions
PocketMoney provides three types of transactions using the Data Entry Slip:
• Deposit - from sources outside PocketMoney. Deposits are any transactions that increase your net worth, such as depositing your paycheck into checking, or depositing an inheritance from Aunt Gertrude into your savings account.
• Withdrawal - to payees outside PocketMoney. Withdrawals are any transactions that decrease your net worth, such as writing a check for your electric bill, spending $10 at the movies, or using your credit card to purchase a new snowboard.
• Transfer - from one PocketMoney account to another. Transfers do not change your net worth because money is just being moved between accounts. Examples include withdrawing cash with your ATM card (into Petty Cash), or writing a check to pay your credit card.
Note: Transfer transactions are saved as two separate entries; one transaction for the transfer from account and one transaction for the transfer to account. Any modifications made to one half of the transfer are made intelligently to the second half.
Data Entry Screen
The Data Entry Screen looks similar to this for Deposit, Withdrawal, and Transfer transactions:
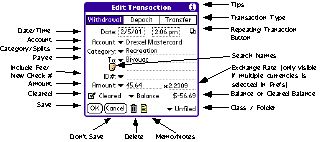
It includes the following elements:
• Transaction Type - either Deposit,Withdrawal, or Transfer.
• Date/Time - the date & time that the transaction took place. Tap on the date or time to pop-up change the date/time. Transactions are listed by Date, so by modifying the date/time you can reorder the way checks are listed.
• Repeating Transaction Button - opens the repeating transaction setup screen. If the box is darkened then the transaction is a repeating transaction.
• Account - the name of the account that you are tracking (e.g., checking, credit card, or any other one that you have created). Tap on the Account
 picker to select an account for the transaction.
• Category - allows you to organize your transactions into categories such as Salary or Interest. Write or key in a name or tap on the Category
 to select a category for the transaction or to access the List Editor. (See “Category Splits” for further information).
• Payee (To/From/Trans To/Trans From) -generally referred to as the Payee field; this label is based on the transaction type. “To” is displayed for Withdrawal, “From” is displayed for Deposit,“T To” and “T From” are displayed for Transfer To and From. Write or key in a name or tap on the
 to pop-up the List Editor to choose a predefined source for the transaction or to add a new source. The pop-up list of choices is dependent upon the Category. For example, if the Category is food, only places from where you purchase food are displayed. You must pick the Account to transfer to from the pop-up list for Transfers. This field is two lines so that long names can be entered.
 HINT: Activate “Auto-add categories and payees” in Prefs to save time editing the pop-up list.
•
 Search Names Button - is a shortcut to entering name or company information that exists in the Address List.
  is not displayed for Transfers.
• Amount - the amount of the transaction. Tap
 to pick from some common amounts (e.g. $100, $50). Edit this list to suit your needs with the List Editor.
• Exchange Rate - the foreign currency exchange rate. Rate is displayed if “Multiple Currencies” is checked in Prefs (See “Preferences” for more information). Enter Amount and exchange rate corresponding to 1 unit of your base currency. For example, if you receive a $20 Canadian payment, then you enter $20 in Amount, and enter 1.33 in Rate. 1.33 Canadian dollars is equal to 1 US dollar.
Note: The exchange rate is saved on a transaction by transaction basis. This allows you to edit the rate after you receive your credit card statement to reflect the actual exchange rate that your credit card company used.
• Id # - check number or any other identifier you want in this field. The pop-up list gives you two options:
• New Check # - PocketMoney searches old entries to find the next available check number. If you want to put ATM transaction numbers into the Id # field, you should prefix the number with “ATM” or some other text to distinguish non-check numbers from check numbers.
• Include Fee - PocketMoney adds a separate transaction for the default fee set by the user in Account Prefs (see Accounts Prefs for more information). No fee transaction is added if the default fee amount value is 0 or blank.
HINT: New Check# (#101) and Include Fee ($) can be quickly accessed by in Pal mOS 3.5 by drawing the shortcut stroke and tapping the appropriate button.

• Cleared - a check in this box means that the transaction has cleared the bank. Use this to reconcile your bank statement.
• Balance - the balance of the account, after the transaction is made. Tap on the Balance label to change the display setting. The choices are Balance, Cleared Balance, and Running Balance.
• Memo/Notes/Description - Several lines of additional information of your choice about the transaction.
• Folder/Class - the folder that the current transaction is filed in. By default, this is “Unfiled”. Use folders to keep your personal finances separate from your business finance for expense reporting. Folders are exported as Quicken classes. The Palm OS limits the maximum number of folders to 15.
Register Screen
The Register screen provides a list of transactions. Register is the easiest way for a quick look at all your data, for fast access to a specific transaction, and for clearing a large number of transactions quickly.
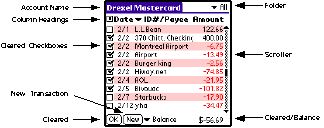
• Account Name - the name of the account that you are viewing. This will be set to “All Accounts” if you have chosen “All Transactions” in the View Menu or you set Account to “All Accounts” in a Custom Filter.
• Column Headings - Tapping  toggles cleared filter setting. The middle column (
 Payee) can display different fields of the transactions. [Account/Category, Account/Payee, Category, Category/Payee, ID# Payee, Memo, Payee]. Tapping Amount toggles the Transaction Type filter setting: - withdrawal, + deposit, = transfer,
  repeating transfers, and blank for all.
• Cleared - a check in this box means that the transaction has cleared the bank. Tap the checkbox to mark a transaction as cleared. Use this to reconcile your bank statement.
• Balance - the balance of the account, after the transaction is made. Tap on the Balance label to change the display setting. The choices are Balance and Cleared Balance.
• New - tap this button to create new transaction.
• OK - tap this button to return to the Account Screen.
To access the corresponding Data Entry Slip from the Register Screen, simply tap the desired transaction.
Note: If you are viewing All Transactions then there are two overview items for each transfer transaction.
Menus
Tap the Menu button
 to access the menus in PocketMoney. Depending on what screen you are in will determine what menu is displayed.
 Options
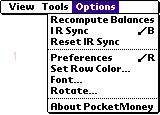
• Recompute Balances - recalculates all your account balances if you modify your PocketMoney data via third party software. (See “Recompute Balances” for further information).
• IR Sync - synchronize transactions to PocketMoney on another Palm. (See “HotSync Scenarios” for further information).
• Reset IR Sync - resets the last sync time and user.
• Preferences - opens the PocketMoney Preferences screen, allowing you to change the default behavior of some features. (See “Preferences” for further information).
• Set Row Color... - select the row color for the account register or for the account list. Turn this option on in the Preferences by checking “Use Color Banding in Register”.
Note: Setting the row color to black for the account list screen will display the rows in the color set for each individual account register.
• Font... - displays the Select Font window. The register and account list tables are displayed in the user selected font.
• Rotate... - own a Handera 330 or other device that can rotate the screen? Rotate opens the Rotate Screen dialog.
• About - displays a screen with the version of PocketMoney and technical support contact information.
View (Register)
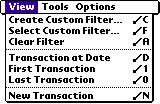
• Create Custom Filter... - opens the Custom Filter Screen in order to create a new filter. (See “Custom Filters” for further information).
• Select Custom Filter... - pops up a list of custom filters that have been saved in the Custom Filter Screen.
• Clear Filter - displays all transactions for the current account.
• Transaction at Date- pops up a date picker and displays transactions starting at the selected date in the register.
• First Transaction - moves to the first record. (Same as moving the scroll bar to the very top.)
• Last Transaction- moves to the last record. (Same as moving the scroll bar to the very bottom.)
• New Transaction- creates a New transaction and opens the Edit Transaction window.
Tools
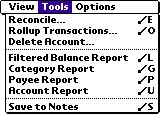
• Reconcile... - allows you to reconcile the balance of cleared transactions against a bank or credit card balance. (See “Reconciling Accounts” for further details).
• Rollup Transactions... - used in conjunction with a filter, rolls up selected transactions into a single transaction. (See “Rolling Up Transactions” for more information).
• Delete Account... - deletes the account displayed in the register.
• Filtered Balance Report - opens the filtered balance screen, which sums up the transaction amounts based on the current filter setting. (See “Reports On Screen” and “Custom Filters” for further information).
• Category Report - generates a report listing amounts spent by Category based on current filter setting.
• Payee Report - generates a report listing the amounts paid per Payee based on current filter setting.
• Account Report - generates a report listing the amounts paid per Account based on current filter setting.
• Save to Notes - saves the register to the Notes/Memo application.
Record

• New - creates a new transaction.
• Duplicate - makes a copy of the current transaction on the Data Entry Slip into a new transaction. The date will be set to the present date & time.
• Beam - beams transaction to PocketMoney on another Palm device.
• New Check # - performs the same functionality as picking New Check # from the ID# pop-up.
• Include Fee - performs the same functionality as picking Include Fee from the ID# pop-up.
• Edit Repeating - open the repeating transaction dialog box.
Lists
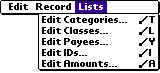
The Lists menu has options to edit the customizable popup lists.
View (Account List)

• All Accounts - shows all accounts on the Account List screen.
• Non Zero Accounts - only displays accounts with a non zero balance.
• Total Worth Accounts - only display accounts with the Total Worth checkbox checked.
To limit which accounts are included in the reports:
View by Total Worth Accounts and check the Total Worth checkbox for the accounts you want in the report,
Tap the Account column heading to view all the transactions with the exception of those which are not included in the Total Worth calculation.
Report

• Save to Notes - saves the report to the Notes/Memo application.
Chapter 3