FDIL Archive Lab
Introduction
In this lab we start with the code produced in the CDIL Archive Lab and add the ability to archive frames from the Newton. Where the CDIL Archive lab backed up strings sent from the Newton by storing them out to file, in this lab we will take an uploaded frame and convert it to a stream of bytes consisting of slot name followed by data values. To do this our basic strategy will be to upload data from the Newton in an unbound form during the archive phase which is parsed and written out to file. Then, during a dearchive, to bind the archived data to dynamically allocated memory and download the bound data back to the Newton.
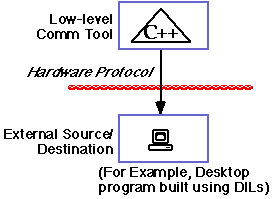
The diagram above shows the relationship between the DILArchive programming running on the desktop machine and the ArchiveTransport running on the Newton during archiving. Basically a frame is sent from an endpoint opened within the ArchiveTransport along the CDIL pipe in a flattened form. It is received on the desktop machine and the FDIL unflattens it and puts it into memory in an unbound form. Dearchiving is much the same save that the memory must be bound to memory locations before it may be sent back to the Newton.
As with the CDIL lab code we will implement opening and closing in a single phase so that the FDIL so that the code may be tested before we get into the much more difficult process of sending and receiving data. This is covered in the section Opening and Closing the FDIL This is followed by uploading a frame in the Receiving Data section which includes parsing the unbound data in order to write it out to file. Next the code to download previously archived data will be added in the section Binding and Sending Data section.
Prerequisites
To do this lab you must have the following:
If you look in the FDIL Archive Code you will find a reference to both a Windows and a Macintosh versions of the code. Each of these versions have the source code files and either a make file (for the Windows and Macintosh MPW code) or a Metrowerks project file (for the Macintosh Code Warrior version) which will allow you to compile and run the lab.
Files Needed
You must have the following files available to you:
On a Macintosh:
Metrowerks:
1. Metrowerks project
2. CDIL library CDIL.CW6.lib (for Metrowerks 6 or later) or
the PPC version CDILPPC.CW6.lib
3. FDIL library FDIL.CW6.lib (for Metrowerks 6 or later) or the PPC version FDILPPC.CW6.lib
4. Universal header file for the CDIL (DILCPIPE.H)
5. Universal header file for the FDIL (HLFDIL.H)
6. Source code files PROTOCOL.C and DILArchive.c
7. The resource file DILArchive.rsrc
8. The following libraries:a. MacOS.lib - for interface code
b. ANSI (2i) C.68K.lib (or PPC version) - for file I/O code
c. CPlusPlus.lib - for CDIL which was written in C++
d. MathLib68K (2i).lib (or PPC version) - for converting numbers to strings
e. SIOUX.68K.lib (or PPC version) - for I/O input formatting
MPW:
1. MPW makefile CDILArchiveMPW.make
2. CDIL library CDIL.MPW.Lib
3. FDIL library FDIL.MPW.Lib
4. Universal header file for CDIL (DILCPIPE.H)
5. Universal header file for the FDIL (HLFDIL.H)
6. Source code files PROTOCOL.C and DILArchive.c
7. The resource file DILArchive.rsrc
8. A fairly recent version of MPW with the following libraries:a. CPlusLib.o
b. StdClib.o
c. Runtime.o
d. Interface.o
On a Windows machine:
1. Make file DILARCHI.MAK (for Visual C++)
2. Source code files DILARCHI.C, PROTOCOL.C
3. Application Header files DILARCHI.H, PROTOCOL.H
4. CDIL header file DILCPIPE.H
5. FDIL header file HLFDIL.H
6. CDIL DLL file CDIL_DLL.DLL (16-bit version) or
CDIL32.DLL (32 bit version)
7. FDIL DLL file FDIL_DLL.DLL (16-bit version or FDIL32.DLL (32-bit version)
8. CDIL DLL library file CDIL_DLL.LIB (16-bit version) or
CDIL32.LIB (32 bit version)
9. FDIL DLL library file FDIL_DLL.LIB (16-bit version) or FDIL32.LIB (32-bit version)
10. Support files DILARCHI.ICO, DILARCHI.DEF and DILARCHI.RC for the minimized icon information, the module definition information and the application resources.
11. Windows SDK (Software Developer's Kit) for usual window libraries, etc.
Code Overview
The protocol used in the FDIL Archive application is shown below:
Sending:
<connect>
Newton->desktop "Sending"
Newton->desktop <data format - "STR " or "FRAM">
desktop->Newton "READY"
Newton->desktop <length of string> (if STR)
Newton->desktop <data> (string or frame)
desktop->Newton "CONFIRMED" or "ABORT"
Newton->desktop "End " or "More" or "Abrt"
<disconnect>
Receiving:
<connect>
Newton->desktop "Receive"
desktop->Newton "READY FOR <data format- "STR " or "FRAM">"
Newton->desktop "Ready"
desktop->Newton <specially terminated string if STR else a frame>
Newton->desktop "Conf" or "Abrt"
desktop->Newton "END ARCHIVE" or "MORE" or "ABORT"
Newton->desktop "End "
<disconnect>
This protocol describes the dialog between the two machines. Essentially the Newton controls the dialog as it starts and ends communications. The format of the data being sent (STR or FRAM) is used to distinguish between Newton strings and frames. In this lab we will add the ability to send and receive Newton frames. The control messages from the Newton to the desktop machine are sent as 4 character strings. The messages from the desktop to the Newton are sent as variable length strings terminated with the EOT (0x04) character. Frame data is transferred in both directions in a flattened format.
As with most communications protocols, there is a certain amount of redundant "talk and response" where one side sends a message and the other acknowledges that the message has been received. This helps to keep the two sides in step with one another. We have built the code in this lab to use serial data transfer using the MNP (Microcom Networking Protocol) compression and error correcting protocol as it guarantees error-free delivery of data; either it all arrives intact or an error is returned to the sender. For clarity all messages from the desktop machine to the Newton are capitalized, while all messages in the other direction begin with a capital letter and are lower case after that.
Both because the FDIL use the CDIL and because the message portion of this protocol is built using strings, there is extensive code already in place to open the CDIL and use it to send and receive message strings. In addition the code to accept and send string-based archives is already in place. To better understand the CDIL you may want to look at the article CDIL Details while to understand how the CDIL portion of this protocol was built you might look at the CDIL Archive Lab.
The starting version of the code has the FDIL calls removed but all of the protocol and interface code intact. It is recommended you become familiar with the code by downloading the relevant version, making sure you can compile it, and look through the source. The places where you will be filling in code are marked with a comment which begins with three stars ('***'). Of course if you don't want to try writing FDIL code yourself you may still want to look through the Archive Lab Solution code.
Trying the Solution
Before doing this lab you may want to run the solution code so you get an idea of what the DILArchive application should look like when you are done with the lab.
Before Starting...
Make sure you have the right kind of cable and know where to plug it into your desktop machine. On a Macintosh to Newton connection you want a "null modem" cable which has circular-8 (mini-DIN 8) connectors on both ends and you may use either the modem or the printer port (make sure the printer port is not being used for AppleTalk). On DOS machines you will want a modem cable again but it may either be a DB-9 connector on the PC side or it may be a DB-25 connector depending on your manufacturer and the vintage of your machine and plugs into a serial port. The Newton side needs to be a circular-8 connector to plug. In both cases the key is that the transmit pin on one side plugs into the receive pin on the other and vice versa (null modem).
On the Desktop Machine
With the Newton connected to your desktop machine, start the compiled DILArchive program (CW DILArchive or FDILArchiveMPW on the Macintosh, DILARCHI.EXE on Windows).
Windows OS Note - the DLL files must be accessible
If everything is working, the application should start with no errors and the TestScripts and Port menus should appear in your menubar. Make sure the correct port is selected (i.e., the one you've got the cable plugged into) in the Port menu and, if you are running on the Macintosh, that you have selected Modem tool from the list of possible connection types.
To Create an FDIL Archive
Start the Newton and install the program CustomRoute from the DTS sample code available from the Newton web page and the transport ArchiveTransport <add our URL) using Newton Installer <add URL when available> or whatever other program you use for downloading Newton software.
Next open either the In Box or the Out Box and tap the information ('i') icon in the lower left of the Box. This pops-up a menu of different transport preferences. Tap on the ArchiveTransport Prefs and tap the Frames radio button at the top right of the preferences slip. This tells the Archive transport to archive frames.
Once this is done, start the program CustomRoute and enter any text you want (or leave the text that's there). Next, tapping the action (envelope) icon, select ArchiveTransport from the pop-up list and then wait for the routing envelope to appear. Now, return to the desktop machine and select Archive from the TestScripts menu. Now return to the Newton, tap on the Archive button below the envelope and select Now from the pop-up.
This should cause a status slip to appear on the Newton and, if everything is working, it should cycle quickly from Connecting to Connected, waiting for response at which point a dialog should appear on the desktop machine asking for a name for the about-to-be-created archive. Once you supply a name and directory the Newton should send the data and the status dialog should cycle to Archiving followed by Confirming and finally Disconnecting before the archiving completes and the status slip disappears.
You should now have a text file on the desktop machine which will have in it a "label" string of "ARKF" followed by the frame data which was sent from the Newton.
To Dearchive the Data
Assuming you are still running the archive program on the desktop machine and that the ArchiveTransport has been installed on the Newton, close Custom Route (if it is still open) and open the In Box from the Extras drawer. Tap the Receive button at the bottom of the In Box and select ArchiveTransport from the pop-up list which appears.
The same status slip should appear on the Newton with the message Connecting in it. Now go to the desktop machine and select Archive from the TestScripts menu. This should complete the connection and cause the Newton status slip to go through the same cycle described in the section on Creating an archive, pausing (save that the message Archiving is replaced by Dearchiving) only for you to select the archive on the desktop machine you wish to download.
After the archive has been sent to the Newton, you will get a new entry (or entries if your archive had more than one string in it) in the In Box.
Archiving Multiple Items
To archive multiple strings, go through the same steps as you did in creating an archive except that in Custom Route instead of selecting Now from the Archive-button pop-up, select Later. This causes the data to be put into an entry in the Out Box. Repeat this for as many strings as you wish to send.
Once you have created several messages to be sent, close CustomRoute, open the In Box and select the items you wish to send by tapping the checkbox to the left of the desired messaged. Next tap on the Send button and select ArchiveTransport from the pop-up list which appears. From here on the steps are the same as described above when you tapped Now from the Archive button.
Dearchiving multiple frames is the same as a single string except that you will have multiple items in the In Box, one for each string archived.
To use the FDIL you must first open and initialize it using the callFDInitFDIL()and, on finishing with the FDIL, the instance of the FDIL must be disposed of using the callFDDisposeFDIL(). Add these calls to the main function at the places with the following comments:
// *** OPEN THE FDIL LIBRARY HERE
and:
// *** DISPOSE OF THE FDIL LIBRARY OBJECT HEREWhile an FDIL object must be created to transfer frames to or from the Newton, there will need to be one object for each sub-frame or sub-array in the download as well as the main frame being downloaded so we will put off discussion of this code until we discuss sending or receiving data.
If you want to refresh your memory on how to open and close the FDIL, see the article FDIL Detailed or look at the DIL documentation Newton Desktop Integration Libraries available on the DIL web page .
This section covers two parts: uploading data from the Newton in an unbound form and parsing the unbound data so it can be written to file. The code here draws heavily from the SoupDrink example code (the author believing strongly in cut-and-paste programming) but some changes have been made to make it easier to use the file to bind data when dearchiving.
The first thing which has to be done is to get the frame from the Newton. Before we can get the data however, we must create an FDIL object. Add the code to create an FDIL object assigned to the local variablethisObjectin the routineDoArchiveat the spot marked with the following comment:
// *** CREATE FDIL OBJECT HERE
In the file Protocol.c, in the routineDoArchive(), add the code to get the data using the functionFDget()at the spot marked with the following comment:
// *** ADD CALL TO GET FRAME HEREBy not binding anything to the FDIL object the frame will be uploaded in an unbound form. This means that the function
WriteFrameToFile()defined further down in Protocol.c will have to walk through the linked list of unbound objects and write them out to file in a different fashion based on the type of the item being written.
Before we look at the unbound data, we must dispose of the FDIL object created inDoArchive. Add the code to dispose of it at the point marked with the following comment:
// *** DESTROY FDIL OBJECT HERE
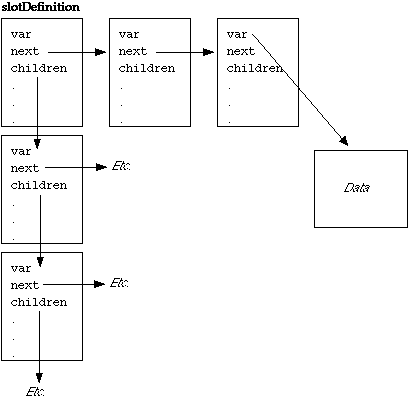
You may recall that the basic structure of unbound data looks like this:
To parse the unbound data we will traverse the list of slot elements in the main frame (the top row of items shown in this diagram) calling a subroutinePrintFrame()which writes the contents of a frame element to file.PrintFrame()recursively parses and prints sub-frames (i.e., the children items shown in this diagram) to file.
This algorithm may be detailed in the following pseudo-code:
for each peer in the main slot definitionprintframe:print the slot value to file
for each child of the slot (if any)printframe
Before we look at whatPrintFrame()does, we must get the unbound data list and loop through it callingPrintFrame()for each item in the list. To do this, add code to get a pointer to the first list item and assign it to the local variable list at the point marked with the following comment within the routineWriteFrameToFile:
// *** GET UNBOUND DATA LISTOnce we have the list, loop through its elements passing them one by one to
PrintFrame()by using thepeerCntmember for loop control.PrintFramehas the following prototype:
void PrintFrame ( slotDefinition *thisEntry );
And should be added to code where the following comment is found:
// *** LOOP OVER THE LIST OF ENTRIES
Next remember that once we are done with unbound data we must release the memory it allocates using the callFDFreeUnboundList(). Add this code at the point marked with this comment:
// *** FREE UNBOUND DATAThere is one more item to note in
WriteToFilebefore we discuss thePrintFramefunction. Note that after writing the frame to file we have the following line of code:
fputc ( '\\', gArchFile );This is here because a backslash is used to delimit the end of a frame when writing the frame to file. As we shall see in
PrintFrame, this is added at the end of sub-frames as well.
PrintFrameis called to write out the current entry and take care of any children in theslotDefinitionfor the entry. The heavy lifting for printing a slot is done by the subroutinePrintSlot(). This routine, which we will look at in a moment, formats the output to file as appropriate for the particularly data type being written. If a slot has children it is a frame or array and we will callPrintSlotonce for each child and will terminate the output for all the children with the backslash character frame terminator.
InPrintFrame,add code to cycle through the children (if any) in the entry callingPrintSlotfor each child. This should be done where there is the following comment:
// *** LOOP OVER THE LIST OF CHILDRENThe prototype for PrintSlot is as follows:
void PrintSlot ( slotDefinition *thisEntry );Finally then we get to PrintSlot which parses the information about an individual slot and prints it out in the following format:
<slot name> <variable type> ["class "<class
name>][<data>]
where angle brackets (<>) denote values, square brackets ([]) denote optional (type-specific) entries and quotation marks ("") denote literal values written to file.
So, for example, a slot with the following value:would get written to file as the following character string:foobar:"Yafoo!"Whereas if it was assigned a class of fooclass it would be written as:foobar STRN "Yafoo!"The code to do all of this is in place but the local variablesfoobar STRN class fooclass "Yafoo!"the_data,the_data_class,the_data_typeandthe_slot_namemust be assigned values according to the appropriate information from theslotDefinitionstructure pointed to bythisEntry. Put this code at the start ofPrintSlotat the point marked with the comment:
// *** INITIALIZE LOCAL VARIABLES
PrintSlot.
Once this code is complete you should be able to archive frames using the techniques described in the section above, Trying the Solution. If this succeeds you should have a new file created which you can check by using any file editor program to look at the contents.
If you would like more details on the FDIL calls used, you may refer either to the FDIL Detailed article or the Desktop Integration Library documentation available on the DIL web page .
The next step is dearchiving data. This is done by reading from an archive file, allocating the appropriate amount of memory from the heap, binding the data read from file to the memory allocated and then, when all the slots of the frame are bound, sending the data down to the Newton.
Since a frame may have sub-frames or arrays, we must consider the situation where we begin binding slots in the main frame and then encounter a sub-frame. In this situation we will recursively bind the slots of the sub-frame to an FDIL object created for the sub-frame and then bind the sub-frame object to the main frame.
This algorithm is shown in the following pseudo-code:
create FDIL object

bindframe:
get first/next slot
if slot is frame or arraycreate FDIL object
subframe := bindframe
bind subframe to FDIL objectelseget heap space for slot
read data from file into heap space
bind slot to FDIL objectsend object to Newton
destroy object and sub-objects
The last step covers deleting memory allocated when we are done binding all the elements in a frame as well as deleting the FDIL objects used. The memory used by the FDIL is deleted when the FDIL object is deleted but memory we allocate off of the heap must be explicitly deallocated when the frame has been downloaded. We handle this by creating two global variables:gDILObjArrayandgMemArray. The first array keeps track of all of the FDIL objects created to store sub-frame and sub-array elements. The second tracks all memory allocated from the heap. We keep a current pointer into each array by adding two more globals:gCurMemItemandgCurDILObj. The routineCleanUpMemorythen destroys all of the FDIL objects and frees heap memory.
To implement all of this we begin in the routineDoDearchivein the 'else' case where we are dearchiving frames. First the code initializes the global memory pointergCurMemItemandgCurDILObj. Next we will create an FDIL object for the frame and put a pointer to it in the local variablenextFrame. Add the code to do this at the point marked with the following comment:
// *** CREATE FDIL OBJECT
Now we will call loop calling the subroutineDearchiveFrameto do the heavy lifting of binding all of the items to the FDIL object for each the current archived item. We will exploreDearchiveFrameshortly but before we do let's consider what else has to happen inDoDearchive.
After the slots have been bound to nextFrame, we will send the frame down to the Newton. If this is the first archived item being sent, the Newton should be waiting for it, otherwise we will send a message along the CDIL pipe telling the Newton that there is more coming. In any event, add the code to sendnextFrameto the Newton at the point marked with the following comment:
// *** SEND NEXTFRAMEOnce the frame is sent we must dispose of the object and clean up all other memory allocated as well. Add the code to dispose of the FDIL object immediately after the call to
CleanUpMemoryat the point marked with the following comment:
// *** DISPOSE FDIL OBJECTMeanwhile, in the subroutine
CleanUpMemoryadd a similar line in the loop which disposes of all sub-objects created to handle sub-frames and arrays.
Back inDoDearchivewe consider what happens after the FDIL object is disposed of. Since we are in a loop dearchiving successive frames from the file, we must allocate another object before returning to the top of the loop. This is again marked by the following comment:
// *** CREATE FDIL OBJECTNote that this create is only done if the previous call to send the frame succeeded without error and after we have checked that the Newton confirmed receipt of the frame we sent.
Outside of the loop we must add similar code to dispose of the FDIL object again at a spot marked with the following comment:
// *** DISPOSE FDIL OBJECTThere is one last consideration which is what to do if there is an error. Since in some cases the Newton is waiting for a frame we must send a frame. This is done in the subroutine
TerminateDearchivewhich creates a frame with a single slot named__ArchiveErrorwhich is of typeBooleanand is set to true. The ArchiveTransport on the Newton looks for such a slot in every frame received and changes state to error handling if such a slot appears. You should add the code at the point marked with the following comments:
// *** CREATE AN FDIL OBJECTWe are now ready to consider the subroutine
// *** BIND A TRUE TO THE __ARCHIVEERROR SLOT
// *** SEND THE ERROR FRAME
// *** DISPOSE OF THE FDIL OBJECT
DearchiveFrame. Basically DearchiveFrame uses the following algorithm again expressed as pseudo-code:
dearchiveframe:

if not array
read slot name and type from fileelseread slot type from fileif not frame or arrayif slot has class get class name
allocate memory from heap for data
update global list of heap objects
read data in from file
copy data to heap location
set type constant used by FDILelseallocate FDIL object
update global list of FDIL objects
if classed array, get class name
dearchiveframe
set type constant used by FDILbind slot to FDIL objectThere are of course special considerations for each type such as the fact that strings may have a class name associated with them but immediates do not or the fact that real numbers must have the byte-order reversed (Big Endian vs. Little Endian) on Windows machines and so on. These are in place in the routine and you may want to read through the code to see exactly how each case is handled.
Within this function you will have to add the following code:
Create objects for sub-frames or arrays; there are three such places in the code all marked with the following comment and all assigned to a local variable,next_obj:
// *** CREATE AN FDIL OBJECTBind the slot to the frame/array object passed in to
DearchiveFrame; this should be added at the point marked:
// *** BIND SLOT TO OBJECT
Once this code is added you should be able to dearchive frames from file. To test this use the procedures described above in the section Trying the Solution.
If you are at a loss on how to make the calls necessary in this section, you may want to review the article FDIL Detailed or the FDIL section of the Desktop Integration Libraries documentation available from the DIL web page.
Because of the constraints of the archiving protocol there are relatively few options to try while remaining within the scope of this lab. However, here are a few things you may want to consider:
1.WriteFrameToFileandPrintFrameloop through the siblings and children of aslotDefinitionstructure. Since they are actually built as a linked list you can walk through these lists by chaining through successive elements in each list. Alter the code used in the lab to walk from one structure to the next instead of looping through an array of elements.
2. On the Newton it is entirely possible to have a frame which refers back to itself indirectly. Consider for example the following NewtonScript code:
frame1:={slot1:1, slot2:2};Here
frame1.slot3 := frame1;
frame1has a slot,slot3which points back toframe1. The FDIL handles this by sending kDILPrecedent as the type of the slot which contains a circular reference. In this case the data passed is a pointer to the object which causes the circular reference. Add code to handle this case.
If you have completed this lab then you have code which demonstrates most of the features currently available in the DILs. If you were simply browsing the lab for more information about the FDIL you might try the article FDIL Detailed. For more information about the CDIL which underlies the FDIL, take a look at the article CDIL Details or the lab CDIL Archive Lab. The Archive Lab Solution has completed versions of both labs available for both Windows and the Macintosh OS using (for the Macintosh) Metrowerks and MPW development systems. Of course, the basic reference for DILs is the Desktop Integration Libraries documentation available at the DIL web page. Also available from the web page is the DTS DIL sample code including SoupDrink and DILette. SoupDrink is discussed in some detail in the lab SoupDrink Walkthrough.
If you would like to step back a little to look at the entire communications system on both the Newton and desktop machines using the DILs, the article Newton 2.0 Communications Overview gives a high-level view of all of the separate components used here.
For more information about Newton endpoint code, see the article Endpoint Overview.
slotDefinition data structure is detailed in the
article FDIL Detailed as
well as being described in the DIL documentation available on the DIL
web page.kDILBLOB) described in the DIL documentation
is not implemented and, as of the writing of this document, never will be.
For completeness sake we have put it into the code but don't actually do
anything with it.Developer Services | Technical Information | Tools | Sample Code
Main | Page One | What's New | Apple Computer, Inc. | Find It | Contact Us | Help
Copyright Apple Computer, Inc.
Maintained online by commscourse@newton.apple.com
Updated 26-Sep-96 by dcd