
Basic Modem Walkthrough Lab
Lab Overview
Introduction
In this lab we will walk through the Newton DTS sample code Basic Modem. It provides a straightforward implementation of code to connect a Newton to a remote device using a modem and then allows strings to be sent back and forth between the devices. In a real application this would only be the beginning, an additional protocol to talk to a service such as a bulletin board system or a packet-based mail system would probably have to be added but Basic Modem has the fundamental code on which such a system could be built.
It is assumed that you have a basic knowledge of endpoint programming. If not you may wish to read the Endpoint Details article before trying this walkthrough or at least the Endpoint section of one of the overview articles: Newton 2.0 Communications Overview or 1.x To 2.0 Communications. If you are unfamiliar with telecommunications programming in general you may want to review the introductory articles: Introduction To Telecommunications and Introduction To Serial and Modem Communications.
We will start by looking at the way Basic Modem handles issues of endpoint state, connecting versus listening and user interface. From there we'll discuss the endpoint definition, how Basic Modem handles connecting or be connected to, sending and receiving data and finally disconnecting and destruction of the endpoint.
Prerequisites
To do this lab you must have the following:
Files Needed
You must have the Basic Modem files: Basic Modem project file, Basic Modem.t, Project Data, and protoDisconnectSlip.
Trying Basic Modem
To use Basic Modem you must have a modem and cable to connect to the Newton. In addition you need to have another machine (whether Newton or desktop) and a modem with which you can use to connect to the Newton running Basic Modem. It may be easier to use another Newton as it has all of the necessary attributes built in and by using Basic Modem (or the 1.x sample Acme Modem) you have software which is written to connect, send and receive in the same way. You must also have two phone lines, one for each modem (unless of course you are using a cellular modem).
Once you have assembled the necessary hardware, download the Basic Modem package to your Newton. Next make sure your modem settings are correct for the modem you are using. To check your current modem settings, open the Extras drawer, tap the filing tab at the top of the Extras view and select Setup from the list of choices that pop up. Once the Setup programs appear tap the Prefs application and select the Modem preference. Make sure the settings are correct selecting (for example) a PC Card connection using a Newton Modem on a tone dial setting.
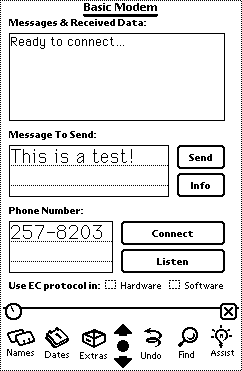
Once the modem settings are checked close the Prefs application, change the file filter for the extras drawer to Unfiled and tap on Basic Modem. This will bring up the following view:You may select a hardware or software error correction (EC) protocol depending on your modem capabilities by checking the appropriate boxes at the bottom of the screen. Next decide whether this Newton will be connecting to another machine or whether it will be waiting for an incoming call. If connecting to another machine, enter the appropriate phone number by scrubbing the number shown and entering the correct number. Next tap the Connect button to initiate a connection or the Listen button to wait for an incoming connection. (Of course if you are making the connection this presumes you have everything ready at the other (receiving) end.)
Once connected you may send information by writing in the Message To Send: area and then tapping the Send button. Any incoming data will appear in the Messages & Received Data: area.
Note that once connected the Connect button changed to either Disconnect or Stop Listening depending on whether you are actively connecting or passively waiting for a connection. To end the session, tap this newly labeled button. A floating slip with the message "Disconnecting. Please Wait..." will appear until the disconnect process is complete.
Note that state messages and other notices from the program will appear in the message area. If an error occurs (say you forgot to turn on the modem...) an error slip will appear with an appropriate error message after which you should be able to start the connection process again.
Code Overview
Basic Modem is a fairly straightforward implementation of a Newton communication application. It has a simple user interface with input areas for phone numbers and data being sent, buttons to control connecting and disconnecting and a message area for displaying messages from the program to the user as well as incoming text.
Basic Modem uses the following programming conventions:1. Views which are children of the base view are named with a lower case v before the rest of the name (e.g.,Note that these conventions are of course for the application slots, named views and methods only. The system slots and method names (such asvConnect).
2. Slots which are not methods begin with the lower case letter f followed by the rest of the name (e.g.,fEndPointState)
3. Methods begin with the upper case letter M followed by the rest of the name (e.g., MConnect)viewSetupDone) conform to their own more liberal naming conventions.
From a programming point of view Basic Modem implements asynchronous connecting and disconnecting and synchronous output of data. To keep track of the connection state of the endpoint a slot calledfEndpointStateis defined in the base view which is initialized to a constant value representing a disconnected state (see the constant definitions in theProject Datafile). From the disconnected state it moves to a connecting (or listening if waiting for a remote connection to come in) state followed by connected state when a connection has been established. Once connected data may be transferred in or out until the user asks to disconnect the endpoint (or it is remotely disconnected) at which point the state cycles to disconnecting and then back to disconnected.
Note that at each point these states provide the necessary information on what has to be done to clean up if there is an error and by usingfEndPointStateBasic Modem can check that the endpoint is in the right state to do the requested action. In other words, if the endpoint is connected and an error occurs, Basic Modem knows it must disconnect, unbind and dispose of the endpoint to return it to the beginning, disconnected state. Similarly, if the state is connecting, sending will not be possible as the Basic Modem code checks that the endpoint is connected before sending.
The key communications methods defined in Basic Modem areMConnect, MConnectActionandMConnectCompProc, MOutput, MDisconnect, MDisconnectAction,andMDisconnectCompProc. The idea is that based on choices the user makes, the methodMConnectwill decide whether to seek a connection or to wait passively for a connection.MConnectActioncalls the appropriate endpoint methods asynchronously to accomplish this andMConnectCompProcis the completion routine for the asynchronous connect attempt.
MOutputis used to send data synchronously using the output spec defined in the slotfEndPointOutputSpecwhile input is handled using the input spec set in the connection completion routine and defined in the slotfEndPointInputSpec.
MDisconnectbegins the disconnect process and callsMDisconnectActionwhich calls the endpoint methodDisconnectasynchronously to carry out the disconnect.MDisconnectCompProcis called after the endpoint is disconnected an it unbinds and disposes of the endpoint object.
The details of these and other relevant methods will be discussed in the sections which follow.
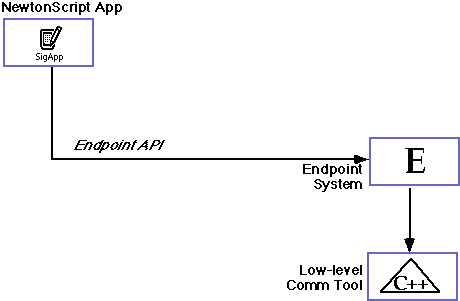
In theviewSetupFormScriptmethod of the base view, the endpoint is defined and assigned to the slotfEndpoint. It is based onProtoBasicEndpointand has the _parent slot defined as beingself(which at runtime should be the application base view). As discussed in the article Endpoint Details this is done so that the endpoint can always find the application base view using the parent inheritance scheme to access the base view's slots and methods.
TheExceptionHandlerslot in the endpoint frame is defined as being the application methodMExceptionHandler. Note that inMExceptionHandlera -16005 error is ignored as it is generated every time theCancelmethod is called. A -18003 error indicates there was a buffer overrun which means that data will retransmitted (since the MNP protocol was specified in the options) so all the handler does is to reset the connection causing the input spec to be reset and then an error slip is put up describing the error. Any other error is treated as a terminal error and the disconnect sequence is begun with a call toMDisconnect.
In addition there are several application specific slots added which are initialized to nil. These are slots which have data which logically belongs in the endpoint rather than in the base view. For example, thefConnectActionkeeps track of whether the endpoint initiated the connection or whether it waited until a connection came in from an external device. The endpoint uses this during connection to decide whether aConnector aListencall should be made.
The uses of these slots are described below:
Once defined the endpoint frame may be used to create an endpoint object as described in the next section.
fConnectAction- set to eitherkAction_ConnectorkListen_Connectdepending on whether the endpoint was actively connected or passively waited for a connection
fConnectAddress- the phone number used to dial the remote device (nilif connected from a remote device)
fDisconnectSlip- a reference to the disconnect slip which appears during the disconnect phase
fPowerOffState- during a shutdown attempt Basic Modem may begin a disconnect (seeMDisconnectAction) and then notify the system that it is not ready to shutdown yet. This slot keeps track of the fact that we are disconnecting due to a power off but have not yet completed the disconnect
fQuiet- controls the display of the error dialog, if true then no dialog is displayed
Before connection can take place however, there are a few other things which Basic Modem does to get ready to go. In theviewSetupDoneScriptof the base view it calls the methodMSetEndpointStateand passes the valuekState_Disconnected.Since the slotfEndpointStatehas this as its initial value, why is it set again? Looking atMSetEndpointStatewe see that it not only sets thefEndpointStatevalue but also sets the text in thevConnectandvListenbuttons. Since the state passed in is a disconnected state it sets the button text to Connect and Listen respectively. As you can see as we progress through the endpoint states the text in these buttons changes appropriately.
The function
kViewIsOpenFuncis defined in the platform file.
Connecting is done in three separate methods as follows:Take a look at these methods and make sure you understand all the code there. Note that if something fails during the connection process Basic Modem gracefully tears down the endpoint and then reports the error.MConnectchanges the endpoint state according to whether we are listening or connecting, building the phone option if needed and then callsMConnectAction.
MConnectActioncreates the endpoint object by calling the Instantiate method, binds it to the low-level comms tool (the Modem tool) and calls the appropriate endpoint method (ConnectorListen) asynchronously. It also registers a power off handler.
MConnectCompProcis the callback routine which handles completion for connect or listen calls. If it is called in response to aListencall (i.e., an external device connects to the Newton), it calls theAcceptmethod.
Make sure you look at theMBuildConfigOptionsmethod which creates the options array which is passed into theInstantiatemethod. As was the case with the endpoint itself, this is done dynamically (rather than simply definingfEndpointOptionsas being an option array) so that the array may be changed dynamically in memory at runtime. For more discussion of this approach see the Code Overview section of the Simple Endpoint Lab.
Power off handlers are described in the article Endpoint Details as well as on pp. 16-14 and 16-15 of NPG: System Software.
Sending data once connected is a matter of getting data entered in the input area (thevInputArea)and passing it as an argument to theOutputmethod when the user taps the Send button (vSend).The Send button'sbuttonClickScriptcalls the application methodMOutputpassing in either the text in the input area or a null string ("") if there is no text in the input area.MOutputchecks the endpoint state to make sure we are connected and if so, send the data with a carriage return character at the end. Note that it uses the output spec defined in the slotfEndPointOutputSpec(currently only a frame which has the form slot defined).
Input is controlled by the input specfEndPointInputSpecframe which is set to be the currently active input spec in the call toMResetConnectionmade first of all fromMConnectCompProc. Note that inMResetConnectionaCancelcall is made beforeSetInputSpecis called. TheCancelmethod terminates the previous input spec and theSetInputSpecmakesfEndPointInputSpecthe current input spec. This input spec defines the expected input as being a string and it will call the methodMInputwhenever it receives a carriage return character.
Note that in both theMOutputmethod and this input spec we use the Unicode character constant for carriage returns as the default encoding for endpoints is to convert outgoing strings to ASCII and incoming strings to Unicode values. This happens after theOutputmethod is called for outgoing data and before theInputScriptis called for incoming data.
As with connecting, disconnecting is done via three routines:MDisconnect,MDisconnectActionandMDisconnectCompProc. TheMDisconnectmethod is called when the user taps on the Disconnect button which is enabled when the endpoint state is set tokState_Connectedin the methodMSetEndpointState.
MDisconnectchanges the state, builds and opens a disconnect slip view and callsMDisconnectAction.In building the disconnect slip view it takes a layout (i.e., a template for a view) and calls the NewtonScript functionBuildContext. This creates a view whose parent is the root view which has the advantage of not depending on the application's existence so that even if the application is closed, the slip will continue to be displayed until the disconnect finishes.
TheMDisconnectActionmethod calls theCancelmethod to stop all outstanding requests and input specs. It then calls theDisconnectmethod asynchronously. Note that it handles errors both in the request toDisconnectand in the asynchronous execution of the method. For more on asynchronous calls, see the discussion in the Opening Endpoints section on asynchronous calls and callback specs in the Endpoint Details article.
TheMDisconnectCompProcis the callback for theDisconnectmethod and it unbinds and disposes of the endpoint object. It also unregisters the power off handler installed in the connection phase and returns the endpoint tokState_Disconnected.
Note thatMDisconnectwill only call theMDisconnectaction if the endpoint is in a connected state whileMDisconnectActiononly calls theDisconnectmethod if the state is connected. Also inMDisconnectActionnote that if there is an error making theDisconnectrequest or if the state is not connected, thenMDisconnectCompProcis called anyway to unbind and dispose of the endpoint.
Finally, in theviewQuitScriptfor the base view thefEndPointslot is removed so that the memory it uses is freed for garbage collection since there are no longer references to it and its slots.
Basic Modem has many other subtle and useful pieces of code for implementing the user interface to the endpoint as well as status information about the endpoint. It is probably worthwhile to poke around the other parts of Basic Modem to understand more about how it is put together. As always, copying and pasting code that is available for your use is a good idea but before you copy code it is a good idea to make sure you understand what you are copying and exactly how it works.
If you want to modify Basic Modem, here are some additional things to try (it is suggested you copy it before you begin making changes so you have a clean copy to refer to):
1. Try sending frames instead of strings.
2. Make sending data asynchronous.
3. Use multiple inputSpecs to implement a simple high level protocol which instead of relying on a carriage return to terminate the input, implements a simple protocol which expects the string length followed by the string itself like this:<string length>Change
<string data>MOutputto do the same thing.
The article Endpoint Details is probably the most central part of the endpoint section of this course. It covers all of the fundamentals of endpoint programming. To try building endpoint code yourself the Simple Endpoint Lab is an easy first step or the Asynchronous Endpoint Lab a more challenging version.
The Input Spec Animation is a good introduction to some of the mechanisms for controlling input of data to an endpoint while the Communications State Machine article describes using input specs to implement a high level protocol.
For more details about specific types of endpoints, the Endpoint Flavors articles describes some of the features and capabilities of different endpoints.
If the Basic Modem sample code was useful to you, you may want to get more of the DTS communications sample code from the DTS Sample ftp site. You should also take the time to read the documentation on communications in NPG: Communications which is available from the Newton Technical Information web site.
kViewIsOpenFunc
is a platform file specific function which takes a view as an argument and
returns true if the view object is open, nil otherwise.
Note that this varies from the function Visible as it returns
true if the view object is open even if the view is hidden.form slot of the output spec. This
means we don't even have to specify the output spec at all (we can call
:Output(data, nil, nil) ). However, the advantage of this implementation
is that if we choose to add things to the output spec we have a frame already
defined. So, if we decided to send a frame (which needs a form slot definition
in the output spec), we could do so simply by changing fEndPointOutputSpec.
Also, early versions of the 2.0 Newton OS had a bug where the form value
was not automatically picked up.Developer Services | Technical Information | Tools | Sample Code
Main | Page One | What's New | Apple Computer, Inc. | Find It | Contact Us | Help
Copyright Apple Computer, Inc.
Maintained online by commscourse@newton.apple.com
Updated 26-Sep-96 by dcd