Newton 2.x Q&A Category: NewtApp

Copyright © 1997 Newton, Inc. All Rights Reserved. Newton, Newton Technology, Newton Works, the Newton, Inc. logo, the Newton Technology logo, the Light Bulb logo and MessagePad are trademarks of Newton, Inc. and may be registered in the U.S.A. and other countries. Windows is a registered trademark of Microsoft Corp. All other trademarks and company names are the intellectual property of their respective owners.


For the most recent version of the Q&As on the World Wide Web, check the URL: http://www.newton-inc.com/dev/techinfo/qa/qa.htm
If you've copied this file locally, click here to go to the main Newton Q&A page.
This document was exported on 7/23/97.

NewtApp


Creating Preferences in a NewtApp-based Application (1/31/96)

Q: How do I create and use my own preferences slip in a NewtApp-based application?

A: In your application's base view create a slot called prefsView and place a reference to the template for your preferences slip there (probably using the NTK GetLayout function.) When the user selects "Prefs" from the Info button in your application, the NewtApp framework will create and open a view based on the template in the prefsView slot.

When your preferences view opens, a reference to your application's base view is stored in a slot called theApp in the preferences view. Use this reference to call the application's GetAppPreferences method. This method will return a frame containing your application's preferences. GetAppPreferences is a method provided by NewtApp and should not be overidden.

When adding slots to the preferences frame, you must either append your developer signature to the name of the preference (for example, '|Pref1:SIG|) or create a slot in the preferences frame using your developer signature and save all preferences in that frame. This will guarantee that you don't overwrite slots used by the NewtApp framework.

Here is an example of how to get the preferences frame and add your data:
        preferencesSlip.viewSetupFormScript := func() 
    begin
        prefs := theApp:GetAppPreferences();
        if NOT HasSlot(prefs, kAppSymbol) then
            prefs.(kAppSymbol) := {myPref1: nil, myPref2: nil};
    end;


To save the preferences, call the application's SaveAppState method:
    preferencesSlip.viewQuitScript := func()
        theApp:SaveAppState(); // save prefs


NewtApp currently provides one built-in preference for where to save new items. In the preferences frame there will be a slot called internalStore. Setting this slot to true will force the NewtApp framework to save all new items on the internal store.


Creating an About Slip in a NewtApp-based Application (1/31/96)

Q: How do I create my own About slip in a NewtApp-based application?

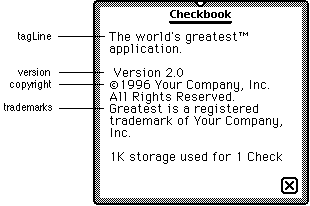
A: Depending on how much control you want, there are two ways to do this. For the least amount of control, create a slot in your application's base view called aboutInfo. Place a frame in that slot with the following slots:

    {tagLine:  "",        // A tagline for your application
 version: "",        // The version number for the application
 copyright: "",    // Copyright information
 trademarks: "",    // Trademark information
}


The information found in this frame will be displayed by the NewtApp framework when the user selects "About" from the Info button's popup. See the picture below for an example of what the user will see.

Alternatively, you can create your own About view. If you do this, create a slot in your application's base view called aboutView containing a reference to a template for your about view (probably using the NTK GetLayout function.) A view will be created from that template and opened when the user selects "About" from the Info button's popup.

Q&A Diagram


NewtSoup FillNewSoup Uses Only Internal Store (2/5/96)

Q: My NewtSoup continues to get the FillNewSoup message, even when the soup already exists. Am I doing something wrong?

A: The NewtApp framework only checks for entries on the internal store to determine if the FillNewSoup message needs to be sent. Check the "Setting the UserVisible Name With NewtSoup" Q&A for more details and a description of how to work around the problem.


Setting the User Visible Name With NewtSoup (2/6/96)

Q: How can I make the user visible name for my NewtApp's soup be something besides the internal soup name, as I can do with RegUnionSoup?

A: There is a method of newtSoup called MakeSoup which you can override. The MakeSoup method is responsible for calling RegUnionSoup (or otherwise making a soup) and then calling the FillNewSoup method if the soup is new/empty.

MakeSoup is called normally as part of initializing the newtSoup object. Here is a sample MakeSoup method that will use a newly defined slot (from the newtSoup based template) for the user name.

The current documentation doesn't tell you everything you need to do to properly override the MakeSoup method. In particular, MakeSoup is used by the newtSoup implementation to initialize the object, so it needs to set up other internal slots. It's vital that the 'appSymbol slot in the message context be set to the passed argument, and that the 'theSoup slot be set to the soup or unionSoup that MakeSoup creates or gets. (Recall that RegUnionSoup returns the union soup, whether it previously existed or not.)

The GetSoupList method of union soups used in this code snippet returns an array with the member soups. It should be considered documented and supported. A newly created union will have no members, so FillNewSoup should be called. This is an improvement over the default MakeSoup method, which always calls FillNewSoup if the soup on the internal store is empty.

The user visible name is supplied via the newtSoup 'userName slot, which is looked up in the current context. As with soupName, soupDescr, etc, you should set a new userName slot in the frame in the allSoups frame in the newtApplication template.

    MakeSoup: func(appSymbol)
        begin
            self.appSymbol := appSymbol;    // just do it...
            self.theSoup := RegUnionSoup(appSymbol, {
                name: soupName,
                userName: userName,
                ownerApp: appSymbol,
                userDescr: soupDescr,
                indexes: soupIndices,
            });
            if Length(theSoup:GetSoupList()) = 0 then
                :FillNewSoup();
        end;


How to Control Sort Order in NewtApp (5/10/96)

Q: While a NewtApp application is running, can I change the order in which soup items appear?

A: Yes, the key to changing the sort order is to modify the query spec in the allSoups frame, and then cause the application to refresh. The cursor that controls the sort order for the layout is built from the masterSoupSlot slot. Both the default and the overview layouts have a masterSoupSlot which points back to the relevant allSoups slot in the app base view.

Here are the basic steps:

1) Ensure newtAppBase.allSoups & newtAppBase.allSoups.mySoup are writeable. (Since the frames reside in the package, they are in protected memory.)
2) Modify the query spec to the new sort order.
3) Now send newtAppBase.allSoups.mySoup:SetupCursor() to create a new cursor using the new query spec.
4) Then do a newtAppBase:RedoChildren() to display the items in the new sort order.
The code would look something like:
      if IsReadOnly (newtAppBase.allSoups) then
        newtAppBase.allSoups := {_proto: newtAppBase.allSoups};
   if IsReadOnly (newtAppBase.allSoups.mySoup) then
        newtAppBase.allSoups.mySoup :={
            _proto: newtAppBase.allSoups.mySoup};
        newtAppBase.allSoups.mySoup.soupQuery := 
            {indexpath: newKey};            // new sort order!
        newtAppBase.allSoups.mySoup:SetupCursor();
        newtAppBase:RedoChildren();


How to Avoid NewtApp "Please Insert the Card" Errors (5/10/96)

Q: If a NewtApp-based application is on a PC card and the card is removed, the user gets the following error message:

"The package <package name> still needs the card you removed. Please insert it now, or information on the card may be damaged."

How can I avoid this problem?

A: While a card is unmounting, if an object on the card is still referenced, then the user will get the above error message asking them to reinsert the card. For more information about issues for applications running from a PC card see the article "The Newton Still Needs the Card You Removed"

The newtApplication method NewtInstallScript is normally called in the part's InstallScript function. One thing the NewtInstallScript does is register the viewDefs in the NewtApp base view allViewDefs slot using the global function RegisterViewDef.

Currently, RegisterViewDef requires that the data definition symbol be internal. If the symbol is on the card, then when the NewtRemoveScript tries to unregister the viewDef a reference to data on the card is encountered and the above error message will be shown. This bug will be fixed in a future ROM.

To work around this bug for any 2.0 based ROM, add the following code to your part's InstallScript before calling NewtInstallScript:

    local mainLayout := partFrame.theForm;
    if mainLayout.allViewDefs then
        foreach dataDefSym,viewDefsFrame in mainLayout.allViewDefs do
            foreach viewDef in viewDefsFrame do
                RegisterViewDef ( 
                    viewDef, EnsureInternal (dataDefSym) );
    partFrame.removeFrame := 
        mainLayout:NewtInstallScript(mainLayout);

Note that it is OK to call RegisterViewDef more than once with the same view definition. RegisterViewDef will do nothing (and return NIL) if the template is already registered.


Customizing Filters with Labelled Input Lines (9/4/96)

Q: I need to open a slot view on a slot that isn't a standard data type (int, string, etc). How do I translate the data from the soup format to and from a string?

A: Here is some interim documentation on the filter objects that newtLabelInputLines (and their variants) use to accomplish their work.

A filter is an object, specified in the 'flavor slot of the newtLabelInputLine set of protos, which acts as a translator between the target data frame (or more typically a slot in that frame) and the text field which is visible to the user. For example, it's the filter for newtDateInputLines which translates the time-in-minutes value to a string for display, and translates the string into a time-in-minutes for the target data.

You can create your own custom filters by protoing to newtFilter or one of the other specialized filters described in Chapter 4 of the Newton Programmer's Guide.

When a newtLabelInputLine is opened, a new filter object is instantiated from the template found in the 'flavor slot for that input line. The instantiated filter can then be found in the filter slot of the view itself. The _parent slot of the instantiated filter will be set to the input line itself, which allows methods in the filter to get data from the current environment.

Here are the slots which are of interest. The first four are simply values that you specify which give you control over the recognition settings of the inputLine part of the field, and the rest are methods which you can override or call as appropriate.

Settings:
recFlags
Works like entryFlags in protoLableInputLine. This provides the 'viewFlags settings for the inputLine part of the proto -- the field the user interacts with.

recTextFlags
Provides the 'textFlags settings for the inputLine part of the proto.

recConfig
Provides the 'recConfig settings for the inputLine part of the proto.

dictionaries
Like the 'dictionaries slot used in recognition, Provides custom dictionaries if vCustomDictionaries is on in the recFlags slot.

Methods:
PathToText()
Called when the inputLine needs to be updated. The function should read data out of the appropriate slot in the 'target data frame (usually specified in the 'path slot) and return a user-visible string form of that data. For example, for numbers the function might look like func() NumberStr(target.(path))

TextToPath(str)
Called when the inputLine value changes. The result will be written into the appropriate slot in the 'target data frame. The string argument is the one the user has modified from the inputLine part of the proto. For example, for numbers the function might look like func(str) if StrFilled(str) then StringToNumber(str)

Picker()
An optional function. If present, this method is called when the user taps on the label part of the item. It should create and display an appropriate picker for the data type. For the pre-defined filters, you may also wish to call this method to open the picker. You should store a reference to the filter in the picker view. Then if the user picks an item, send the filter instance a PickActionScript message. If the picker is cancelled, send a PickCancelledScript message.

Note: If this method is defined, a pick separator line and the text "Other..." will be added to the labelCommands array.

PickActionScript( newValue )
An optional function. This method should be called when the user selects something from the picker opened through the filter's Picker method. If you override this method be sure to call the inherited PickActionScript method.

PickCancelledScript()
An optional function. This method should be called when the user cancels the picker opened through the filter's Picker method. If you override this method be sure to call the inherited PickCancelledScript method.

InitFilter()
Optional. This method is called when an inputLine that uses this filter is first opened. This method can be used to get data from the current environment (for example, the 'path slot of the inputLine) and adjust other settings as appropriate.


Using Custom Help Books in a NewtApp-based Application (12/2/96)

Q: I have created a help book for my NewtApp-based application. Can I make my application open the help book when the user chooses "Help" from the info button?

A: Yes, there is a newtApplication slot called helpManual. You should store a reference to your help book in this slot.

There is also a slot called viewHelpTopic which you can use to dynamically change the location the help book is opened to. This slot should store the name of the topic to open to.

See the DTS Sample Code project "Beyond Help" for an example of a help book.


Creating a Large newtEditView/newtROEditView (12/2/96)

Q: When I use newtEditView or newtROEditView, I cannot scroll through all the text of a large note. After a few pages it stops scrolling. What is going wrong?

A: Both newtEditView and newtROEditView have a default scroll height of 2,000 pixels. To work around this limitation, you will need to add a slot called noteSize to your newt(RO)editView. This slot should hold an array of two elements. The first element is the scroll width. If you do not want horizontal scrolling, the scroll width should equal the view width. The second element is the scrollHeight.

Here is an example noteSize slot that you would use to create a newt(RO)EditView with a scroll height of 20,000 pixels.

    {    
    _proto:        newtEditView,
    noteSize:    [viewWidth, 20000],
    ...

}


How to Use ForceNewEntry with NewtApp (12/2/96)

Q: I have a newtApp-based application which does not use stationery. If I set the forceNewEntry slot to nil in my layout and open the application with a nil target, I can still see the entry view. How can I avoid this?

A: You will need to check for the existence of a target frame. If one does not exist then close the entry view.

You will not have this problem if you use stationery because the newtApp framework will not open the stationery if a target does not exist.


How to Programmatically Open the Header Slip (1/3/97)

Q: I like the way the Newton Works application (for Newton 2.1 OS) automatically opens the header slip each time a new entry is created. Can I make my newtApp-based application do this?

A: Yes! The newtEntry(Roll/Page)Header proto has a PopIt method which opens the header. You will need to override the StatScript of your newtNewStationeryButton and send the header a PopIt message. Because PopIt is not defined prior to Newton 2.1 OS, you will need to check for its existence before calling it. Here is a code example:

    newtNewStationeryButton.    StatScript: func( theStat )
        begin
            // Keep a copy of the inherited return value for use below
            local result := inherited:?StatScript( theStat );

            // Pass self as a parameter for the closure.  This gives us a reference
            // to the application so we can get the entry view.
            AddDeferredCall( func( context ) 
                                begin
                                    local entryView := context:GetTargetView();

                                    // This code assumes that your header is declared to the entry
                                    // view with the name theHeaderView
                                    if entryView.theHeaderView.popIt then
                                        entryView.theHeaderView:Popit( true );
                                end, 
                            [self] );

            result;
        end;


Programmatically Changing the Default ViewDef (1/3/97)

Q: I want to be able to programmatically change which viewDef is shown when I tap the "New" button in my newtApp-based application. How can I do this?

A: By default, the viewDef which is shown when you create a new entry is the one with the value 'default in its symbol slot. To change this behavior at run-time, you will need to override the StatScript method of your newtNewStationeryButton.

In the StatScript method, you will set two slots in your application. The first slot is the preferredViewDef slot in your application's base view. The second is the viewDef slot of the current layout. Both of these slots should be set to the symbol of the viewDef that you want displayed. For instance, you might have the following StatScript:

StatScript := func( theStat )
begin
    preferredViewDef := 'myNewDefaultStationery;
    layout.viewDef:= 'myNewDefaultStationery;
    
    // Make sure we call the inherited method
    inherited:?StatScript( theStat );

end;


Note: you must not modify either the application's preferredViewDef slot or the layout's viewDef slot at any other time. Doing so could cause your application to not work on future versions of the Newton OS.


How to Properly Declare NewtApp Views (1/6/97)

Q: I have a newtEntryPageHeader which is declared to my newtLayout view. Each time I change entries in my application, the header does not get properly updated. What's going wrong?

A: If you declare your newtApplication views, they need to be declared to their parent. Declaring newtApplication views to a grandparent can cause undefined behavior.

Because of how the declare mechanism works, you must be careful when you declare a view to a grandparent view. In some circumstances, you could try to access a view which has been closed.

As an example, pretend you have three views called viewA, viewB, and viewC. They have the following heirarchy.:

ViewA (grandparent)
ViewB (parent)
ViewC (child)

ViewC is a child of viewB and viewB is a child of viewA; ViewC is declared to viewA. If you close viewB, viewC will also be closed because it is a child of viewB. Since ViewC was declared to ViewA, ViewA will still have a reference to viewC which has been closed. Sending view messages to viewC will throw.

For more information on the Newton OS declare mechanism, see the "Declaring Multiple Levels" Q&A, and the "The Inside Story on Declare" appendix in the Newton Programmer's Guide.


How to Create Custom Overviews with NewtApp (1/8/97)

Q: My NewtApp-based application can print successfully, but I want a custom format that can print multiple items on one page or handle different transports than the default overview supports. How do I do this?

A: Add an overviewTargetClass slot to your application (or any other layout that is a descendent of your newtOverLayout). Set this slot's value to be the symbol that represents your data class (for example, '|myData:SIG|), which must match the data class you use when registering your print format. The NewtApp overview will use overviewTargetClass instead of the default overview class ('newtOverview) supplied by newtOverLayout.

You must still register your print format, but you must set its usesCursors slot to true indicating that it will use the value target as a multiple item target and it will iterate over it using GetTargetCursor(target). For an example of a print format that can handle multiple items, see the MultiRoute DTS sample.

For more information about the default overview class ('newtOverview) , see the Q&A "Limitations with NewtOverview Data Class".


How to Store Prefs in a NewtApp-based Application (1/17/97)

Q: I want to save application-specific preferences and state information before my application is closed. What is the best way to do this?

A: You can save application-specific information in the frame in the prefsCache slot of your NewtApp-based application. This slot is defined in your application's base view by the NewtApp framework. This frame will be saved to the system soup when the application closes.

When you add to the prefsCache frame, you must use your registered signature to avoid conflicting with slots that the framework may use. You can name each of your preferences with your signature, or we recommend adding a subframe in a slot named with your signature. For instance, you might have the following code:

prefsCache.('|MyPrefs:MySIG|) := {pref1: 1, pref2: 2};


A CheckAll Button for NewtApp Overviews (3/4/97)

Q: What do I have to do to get the Check All button to appear in my overview? What's the compatible way to do this so that the application works on Newton 2.0 OS as well?

A: In Newton 2.1 OS, there is a proto called newtCheckAllButton (@872) which you can use. This proto sends the CheckAll method to the layout. In Newton 2.1 OS, newtOverLayouts have two new methods, CheckAll and UncheckAll, which implement this behavior. However, none of this is present in Newton 2.0 OS .

To create a check all button that works on the Newton 2.0 OS, you will need to create the button yourself and implement the CheckAll and UncheckAll methods for your overview layout (or any other layout you wish to implement check all for.)

Older versions of the DTS sample code (either "Checkbook-7" or "WhoOwesWhom-3") do have a protoCheckAllButton. These samples implement an earlier (and less useful) flavor of Check All. The old samples check all the items which are currently visible in the overview, while the Newton 2.1 OS checks all the items that are present in the currently selected folder/card filter. "Checkbook" (version 8 or later) or "WhoOwesWhom" (version 3 or later) will reflect the Newton 2.1 behavior.

Until the updated samples are available, start with the protoCheckAllButton from the older sample code, since that gives the correct look and button bounds, and modify it as follows:

The check all button's buttonClickScript should look something like this:
   func()
        if newtAppBase.currentLayout = 'overView then
            begin
                if layout.checkAllPrimed then
                    layout:UnCheckAll()
                else
                    layout:CheckAll();
                layout.checkAllPrimed := NOT layout.checkAllPrimed;
            end;


The overview layout's CheckAll and UncheckAll methods should look something like this:

    CheckAll:
        func()
            begin
                local curse := dataCursor:Clone();
                curse:Reset();
                hilitedIndex := nil;
                selected := MapCursor(curse, func(e) MakeEntryAlias(e));
                AddUndoSend(layout, 'UnCheckAll, []);
                layout:DoRetarget();
            end;

    UncheckAll:
        func()
            begin
                hilitedIndex := nil;
                selected := nil;
                layout:DoRetarget();
            end


Note that these methods make use of two undocumented slots: hilitedIndex and selected. hilitedIndex is used internally by newtOverLayout to track the tapped item. You may set it to NIL (as above) to clear the value, but do not set it to some other value or rely on its current value. selected contains an array of aliases to soup entries representing the currently selected items, and will be used by the routing and filing buttons for processing entries. It is important to clear hilitedIndex when modifying the selected array in any way.

The resulting CheckAll button should be included in the menuRightButtons array for the status bar. The older sample code puts it on the left, however user interface discussions as part of the Newton 2.1 OS effort resulted in the decision to place the button on the right.


Creating a Simple NewtApp (4/7/97)

Q: What are the basic steps to create a simple NewtApp-based application?

A: The following steps will create a basic NewtApp-based application:

Basic Setup
1) Create a project.
2) In NTK's Project Settings dialog, set Platform to "Newton 2.0" or "Newton 2.1".

Create the NewtApp base view
1) Create a layout file.
2) Drag out a newtApplication.
3) Set the following slots to the following values:
        allLayouts:    {

default: GetLayout("default.t"),
// see step 9 in the next section
overview: GetLayout("Overview.t"),
// set step 4, overview section
}

    allSoups:       {
        mySoup: {
            _proto: newtSoup,
            soupName: "SoupName:SIG",
            soupIndices: [],
            soupQuery: {}  } }
    title: kAppName

4) Draw a newtClockFolderTab or newtFolderTab as a child of the newtApp.
5) Draw a newtStatusBar as a child of the newtApp.
6) For the newtStatusBar set the following slots:
    menuLeftButtons:  [newtInfoButton]
    menuRightButtons: [newtActionButton, newtFilingButton]

7) Save the layout file as "main.t" and add it to the project.

Create the default view:
1) Create another layout file.
2) Draw a newtLayout in the new layout file.
3) Add a viewJustify slot to the newtLayout and set it to parentRelativeFull horizontal and vertical.
4) Set the viewBounds of the newtLayout to:
        {top: 20, // leave room for the folder tab
    bottom: -25,  // leave room for the status bar
    left: 0, 
    right: 0}

5) Draw a newtEntryView as a child of the newtLayout.
6) Add a viewJustify slot and set it to parentRelativeFull horizontal and vertical (necessary only until platform file is updated).
7) Set the viewBounds of the newtEntryView to:
        {top: 0, bottom: 0, right: 0, left: 0};

8) Draw slot views as children of the entry view to display slots from the soup entry.
For example:
a) Draw a newtLabelInputLine as a child of the newtEntryView.
b) Set the following slots:
        label:  "My Label"
        path:   'myTextSlot

c) Draw a newtLabelNumInputLine as a child of the newtEntryView.
d) Set the following slots:
        label:  "Number"
        path:   'myNumberSlot

9) Save the layout file as "default.t" and add it to the project. Move it so that it is compiled before the main layout (use the Process Earlier menu item).

Add Overview support
1) Create another layout file.
2) Draw a newtOverLayout in the new layout file.
3) Add the Abstract slot to the newtOverLayout, for example:
            Abstract := func(item, bbox )
        begin
            local t := item.myTextSlot & ",";
            if item.myNumberSlot then
                t := t && NumberStr(item.myNumberSlot);
            MakeText(t, bbox.left+18, bbox.top,
                bbox.right, bbox.bottom - 18);
        end;

4) Save the layout file as "overview.t" and add it to the project. Move it so that it is compiled before the main layout (use the Process Earlier menu item).

Add InstallScript and RemoveScript
1) Create a text file and add the following to it:
    InstallScript := func(partFrame) begin
    partFrame.removeFrame :=
        (partFrame.theForm):NewtInstallScript(partFrame.theForm);
    end;

    RemoveScript := func(partFrame) begin
         (partFrame.removeFrame):
      NewtRemoveScript(partFrame.removeFrame);
    end;
2) Save the text file and add it to the project.


NEW: Registering Soup Change Notifications in NewtApp (5/15/97)

Q: I have an application based on the NewtApp framework. When I register to receive soup change notifications, things start to behave strangely. What's going wrong?

A: This problem is caused because of a naming conflict. When your application is opened, the NewtApp framework registers to receive soup change notifications using your application's symbol as the callbackID parameter to the RegSoupChange global function. If you also use your application's symbol as the callbackID parameter, you will overwrite the NewtApp framework's registration. There are two ways to work around this problem.

1) Use a different callbackID symbol in your call to RegSoupChange.
2) Use the NewtApp framework's registration callback method. When your soup has changed, the NewtApplication's NewtSoupChangedNotify method is called. It is passed the same four parameters as the callback function parameter of RegSoupChange.

If you do override the NewtSoupChangedNotify method, be sure to call the inherited method.

Here is an example:

    application:NewtSoupChangedNotify(theName, appSym, changeType, changeData)
begin
    // Do your stuff here
    
    inherited:?NewtSoupChangedNotify( theName, appSym, changeType, changeData );
end;