Newt Tech

Overclocking the Newton, 2010
Completing the procedure that allows you to overclock the MessagePad 2x00 isn’t so hard...if you’ve ever done any soldering of circuitry (like replacing a bad component on an older circuit board), you should be okay. The keys are lots of patience...and a soldering iron just hot enough to melt the solder you want melted (and leave the rest alone!)
Many smaller “mom & pop” electronic component stores and supply houses have a discount bin with various circuit boards, cables and so on...for a few dollars you can have some good practice desoldering and resoldering components on something that won’t be lost if gets messed up. Or, find a yard or garage sale in your neighborhood and pick up a old clock radio or something for cheap. You get the idea.
Why overclock? The MP2x00 runs at about 162MHz...overclocked, it runs at about 220MHz. The difference in typical day-to-day use is noticeable...but for browsing the Web (or any application that requires moving large amounts of data), its speed is now both very fast (compared to normal) and very cool. There are some limitations though...and you’ll read about those in the link below.
The basis for this project is found here. Much credit must be given to Stephanie Maks for doing all the “heavy lifting” on what could have been a fairly daunting task. Because she’s already said it all and so well, I’m not going to repeat the steps required...just share my personal experiences, give you some tips, and provide some more updated information on parts that I used and where to find them (which can be as challenging as the project itself!)
And, since she thought it was a good idea...I’ll include this:
Disclaimer and Warning: The information provided below is provided for entertainment purposes. By attempting any modifications to your Newton you will definitely void any remaining warranty you might have, and could destroy your Newton completely. I am in no way liable or responsible for your actions or how you use the information below, nor am I liable or responsible for any unexpected or undesired results arising from the modifications described on this page. Soldering experience with Surface Mount components is required. This is definitely not for beginners. You have been warned.
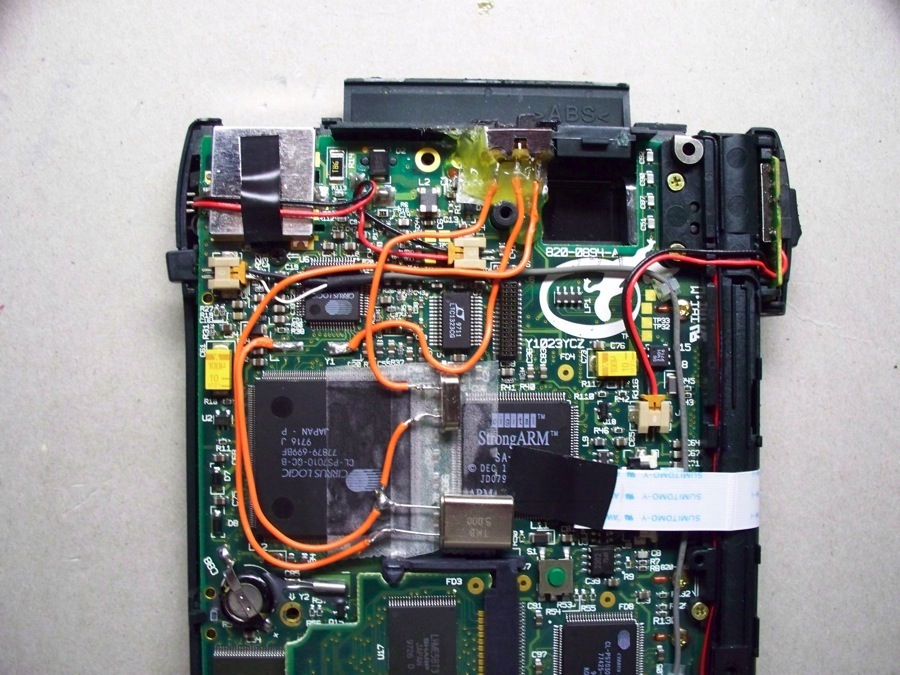
Above you see my MP2100 upon completion...there is very little difference between the Planet Stephanie (PS) version and mine. I used heavier wire and routed it a little more carefully, but that’s it. I chose heavier wire because it’s easier to kind of “pre-form”, which helps it lie better on the board. I also used double-stick tape and a blob of hot glue for the switch. And, a word on that--be careful that the switch you use doesn’t have any openings into its innards that would allow the hot glue to get in. I had this work all done, only to find that the switch wasn’t connecting due to hot glue blocking the second set of contacts. I had to rip up the switch (and there were small surface mount components underneath that could have easily been torn loose, damaging the board...or they could have been easily lost). I was lucky, there was no damage. So--BE SURE before applying the hot glue that all is the way it should be.
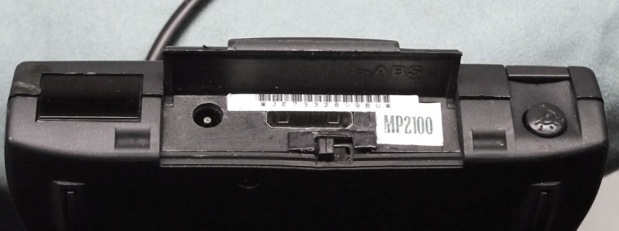
When I installed the second switch I didn’t leave an offset between it and the case...I put it against the top edge. Initially I thought that might give it some more stability...but I had to gouge the back part of the case to remove enough plastic to allow the case to close. And, the switch I used was too wide...I’ve since found a smaller thinner one that has an actuator that is flush to the switch surface (you use the stylus to activate it). I had to carefully file down some of the actuator shown below (it was too tall to suit me) so the serial dongle wouldn’t interfere with it. An offset would have solved this, and I had that offset for the first one that failed. The flush actuator of the newer switch would make this a non-issue.
Here’s how the switch looks...ah, don’t we learn by doing! I added a small plastic “guard” mostly to cover up the hole that I made too big (that case plastic really does come off in chunks, you’ll have to watch that!).
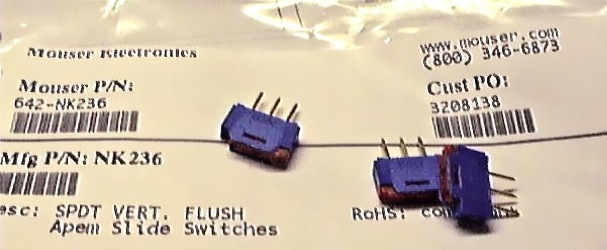
All the parts one would need to complete this project can be found through Mouser Electronics...I highly recommend them. For those geeky enough to want to peruse some specs, click here for a PDF data sheet on the flush switch I’ve mentioned.
The link for Mouser Electronics is here.
Below you can see the first parts I used. If you’re very careful you can salvage the original crystal (3.686MHz) when you remove it from the Newt.
From left to right, we have that 3.686MHz crystal that I was able to salvage....the switch that was too big (note this one measures 5 mm deep, while the NK236 from Mouser is only 2.6 mm)...and the 5.00MHz overclock crystal (if you look closely you can see the “5.000” on it).
Finally...here’s a picture of the NK236 switches I just received from Mouser. The dark red area is the actuator...barely visible is a small dot in the center of the righthand switch, which is one way to slide it with the stylus. Another is to just push on either end of the actuator.
As of this writing I haven’t actually installed any of these...I have some concerns as to how sturdy they are for repeated use (which is one of the reasons I used the bigger switch). Write me and tell me of your experiences...and also the next time I do this I’ll update this weblog with how well the smaller switch worked out. Also, I preferred to finish all the wiring before I mounted the switch, so I could test it first. The PS site instructs you to attach the switch first...that’s up to you.
So, in closing: gain some soldering experience, if you don’t already have some...use a good 15W (or so) soldering iron and keep the tip clean of excess solder and debris by wiping it often with a clean rag...plan your work in advance as much as you can...and work slowly and patiently. Check your finished work against the wiring diagram before you power the Newton up...then check it again. And yes--check it again. A wrong connection can fry your Newton, and it’s so easy to prevent.
Good luck...and Happy Overclocking!

Thursday, March 4, 2010